• Dear forum visitor,

    It looks as though you have not registered for a forum account, or are not signed in. In order to participate in current discussions or create new threads, you will need to register for a forum account by clicking on the link below.

    Click here to register for a forum account!

    If you already have a forum account, you can simply click on the 'Log in' button at the top right of your forum screen.

    Your Elvenar Team

Battle Battle Knowledge

helya

Beloved Ex-Team Member
1666382271081.png
You can find Scrolls of Battle Knowledge in this thread. If you have a link or guide you'd like added, please let the Battle Scroll Keeper know!

Direct link to the Elvenar Wiki Battle page
 
Last edited by a moderator:

crackie

Chef, Scroll-Keeper, Buddy's #1 Fan
Battle Knowledge Banner.png
Table of Contents
Appendix
 
Last edited:

crackie

Chef, Scroll-Keeper, Buddy's #1 Fan
Know Thy Friends and Enemies
Related Links: Unit Stats Overview, Combat Pentagon

The in-game unit infos are super generic! On both browser and mobile, unit effectiveness is depicted via the sword system with 5 swords signifying highest strength. Based on the info given with the 3* Golem as an example, one would assume that he's equally effective against both Light Melee and Light Range Units since they both show 4 swords.

Tooltip-b.jpg
Tooltip.jpg

This is slightly misleading. While he performs pretty well against a Light Range (Combat Pentagon), if you look at the Unit Stat numbers for his attack bonuses though, the 3* Golem performs significantly more favorably against Light Melee (+80%) than Light Range (+20%). Therefore, you can use him effectively against Light Range, but he's even better as a Light Melee specialist! If you want to understand nuance between the units, get to know the Unit Stats Overview chart!

golem stats.jpg

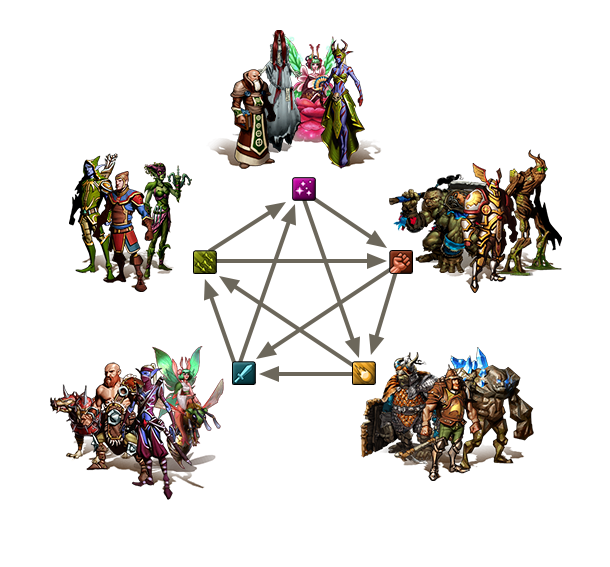
The Combat Pentagon assigns each class type to have two strengths and two weaknesses, which means his specialty can only be from one of two class types. For example: Heavy Range units are strong against Light Range and Light Melee according to the Combat Pentagon. The Golem, being a Heavy Range, will be stronger in only one of the two. In his case, it's the Light Melee. The Orc Strategist, also another Heavy Range, is stronger against the Light Range. Therefore, it's not too difficult to remember their killer specialty after several rounds of battles each week if you understand the Combat Pentagon.

How to read the Combat Pentagon:
Outgoing Arrows = Strengths
Incoming Arrows = Weaknesses
Combat_Pentagon.png

Using Army Setup Window to Determine Strengths and Weaknesses
(Thanks to @samidodamage for this tip!)
Alternatively, you can use the troop selector from the Army Setup window as a guide to help you determine which classes a unit is strong or weak against. The unit class will be strong against the two classes immediate to its right and weak against the two classes immediately to its left (wraps around).
1657735010496.png
For example, the Mages (slot 3) are strong against Heavy Melee (slot 4) and Heavy Range (slot 5) to its right, but weak against Light Range (slot 2) and Light Melee (slot 1) to its left. As already discussed above, the Heavy Range (slot 5) is strong against Light Melee (slot 1) and Light Range (slot 2) to its (wrap around) right and weak against Heavy Melee (slot 4) and Mage (slot 3) to its left.
1657735181801.png


Last edited:

crackie

Chef, Scroll-Keeper, Buddy's #1 Fan
Making Sense of Initiative, Movement, and Range - Part I
Related Links: Unit Stats Overview
, Battlefield

(Review the Battlefield wiki before you begin if you don't already know how Positions on the map are determined relative to the Army Setup window.)

Three key attributes that influence a battle more than a unit's attack numbers are probably Initiative, Movement, and Range. The game uses the funny term "Initiative" to describe the order in which units act during a battle. On the Unit Stats Overview Page, it is the last column under a unit's Attributes section. The unit with the highest Initiative number goes first, which happens to be Mist Walker, whose Initiative is 21. If two units share the same Initiative number, then the tie-breaker goes to the unit with the higher Position number. A unit's movement numbers dictates how many hexagon tiles it can move and the range number is the number of hex tiles away it can fire at. Understanding how these three numbers work together helps you understand the underlying action of a battle without needing to see the battlefield, such as in the case of an auto-fight.

INITIATIVE
Knowing which unit goes first is probably the most useful info to apply during troop selection after troop strengths/weaknesses. If you pick a unit that acts before the enemy, then you get a free pot shot in before the enemy even gets to act. If your unit acts after the enemy, then you have to absorb their pot shot instead. You want to be the one that shoots first! If you are able to completely eliminate the enemy on opening round, you go into the second round with a huge numbers advantage! A typical tournament encounter pairs 5 of your units against 5 enemy units. If there are 2 mages present and you are able to kill them both on opening round with Light Range, then you enter Round #2 using 5 units to their 3! You get to fire off 5 shots while the enemy only gets 3 off. It makes the fight so much easier every round thereafter. However, within the class type, unit Initiative numbers can vary, meaning not all Light Range share Mist Walker's Initiative of 21, for example.

There are a few exceptions, such as the Golem sharing same Initiative as a Hellhound, but the general order of activity by class type is as follows:

1. LIGHT RANGE > 2. MAGE > 3. LIGHT MELEE > 4. HEAVY RANGE > 5. HEAVY MELEE

ATTACK ZONE
Pairing Initiative information with a unit's Movement and Range values, you can then get an idea of a unit's final attack zone and who are the available targets. All of your units start on the left-most hexagon of each row. Accounting for their initiative (Crossbowman 19, Archer 18), max movement of 3, and their range of 4, here is the breakdown of where they can move to and where they can hit:
LR-Range-map.jpg

Archer/Crossbowmen Attack Zone
Notice a Light Range in "Long" Position only has one target directly across, but a Light Range in "Short" Position (row shifted half hex to the right) can reach enemies in adjacent rows. The enemy units on the right side are all possible enemy units that act after both Archer and Crossbowman. Therefore, they must all stay put like sitting ducks in their starting positions while you shoot first. However, both Mist Walker and Ranger act before Archers/Crossbowmen so they must brace for potential pot shots from either of them, but the Archer/Crossbowmen can retaliate by their turn as both Mist Walker and Ranger will be in their attack range.

Also note that the Bandit pictured is in Position 2 (yellow numbers) while our Archer/Bandit are in Positions 3 and 9. A Bandit shares the same Initiative number as the Archer (18). However, as the Archer/Bandit's Position Numbers are higher, they would get to act before the Bandit...sucker!

CASE STUDY - LIGHT RANGE
Here is an example of an encounter with the same enemy group, but using 2 different Light Range troop selections.

ArcherInitiative.jpg

Scenario A
Here, we opted to use a Ranger in Position II to face the Bandit. A Ranger has an Initiative number of 20 while a Bandit's Initiative is only 18. Therefore, the Ranger gets to act before the Bandit. A Dryad's Initiative is 17, so she is the last Light Range to act. As already established earlier, a Mist Walker's Initiative of 21 means she always acts before everyone. After the Mist Walker shoots her pot shots, it's then the Ranger's turn. He can return the favor on the Bandit, who has to play the sitting duck, or he can shoot at a Mist Walker also in range.
ArcherInitiativeMap.jpg

Potential Battlefield with Scenario A on Ranger's turn
Now, if we were to use all Dryads in the unit selection window, the Battlefield will settle unfavorably to the enemy's benefit. Instead of 2 pot shots from the Mist Walker, we now have to take 3 pot shots, with one from the Bandit too! If you are facing 3* enemies, then each of those pot shot comes with a buff or debuff, which means when it's your turn to act, your guys are now shooting with weakened attacks or are prone to more damage when hit. If it's a very high province encounter in the tourney, then the enemy already grossly outnumber you. Each pot shot you take will hurt a lot and your stack might not even survive it! Initiative matters!
ArcherInitiative2.jpg

Scenario B
ArcherInitiativeMap2.jpg

Potential Battlefield with Scenario B on Dryad's turn


Last edited:

crackie

Chef, Scroll-Keeper, Buddy's #1 Fan
Making Sense of Initiative, Movement, and Range - Part II
Related Links: Unit Stats Overview, Battlefield, Combat Pentagon

(Review the Battlefield wiki before you begin if you don't already know how Positions on the map are determined relative to the Army Setup window.)

CASE STUDY - HEAVY RANGE
As Heavy Range generally do not act until after all the Light Range, Mages, and Light Melee have gone, the map is a lot more unsettled from its initial starting position on their turn. Here is the Attack Zone Map for mid-range Heavy Range unit, such as Golems and Orc Strategists:
HR-Attack-Map.jpg

Mid-range Heavy Range Attack Zones

All units begin the fight on the far right hexagon as their starting position. All the units circled in RED have already taken their turn due to their higher Initiative values. Their current location is the final destination after expending their max movement. None of the Heavy Melee have gone yet so are still sitting pretty in their starting positions. The Cannoneer and Orc Deserter are also sitting at the edge since their Initiative numbers are lower than either Golem or Orc Strategist. Then you have 2 units, the Hellhound and the Steinling (circled in ORANGE), that share the same Initiative values as either the Golem or Orc Deserter. It is important to note that the Golem/Orc Deserter's max movement is 3 and their range is also 3, which means neither of them can reach the enemy's original starting positions regardless of whether they are in a "short" or long" position! Therefore, they can only reach enemy units that have moved forward before them on their opening turn.

To see how that plays out, we will once again look at an example using the same enemy set. This time, we're using the same troop selection, but changing where we insert the Golem to change its Position value. Note: There are better units to use than Treants with this particular enemy combination, but they are only there to isolate the Golem for the case study. Let's see how that plays out...

HRInitiative.jpg

Scenario C - Golem in Position I
HRInitiativeMap1.jpg

Potential Battlefield with Scenario C on Golem's turn

The unit to act first with the highest Initiative is the Archer. With enough buffing (Enlightened Light Range or fed Fire Phoenix) or a developed Needles of the Tempest, the Archer can march forward and kill the Enchantress on his round (RED X = dead). Normally the mages go next, but she's dead, so moving on! Since the Golem shares the same Initiative as the Hellhound and the tiebreaker goes to Position number, that means all the Hellhounds in this example will act before the Golem. They will likely attack the Archer first and when he's dead, attack the Golem. When it's the Golem's turn, he can reach any of the Hellhounds to retaliate, but he will likely be slightly weakened by a bite. The Hellhound that took the pot shot on the Golem after the Archer died will now be within range of 3 Treants that haven't acted yet. At least 2 Hellhounds will take decent damage at the conclusion of Round 1.

Now let's see what happens when we move the Golem to Position 5...

HRInitiative2.jpg

Scenario D - Golem in Position V
HRInitiativeMap2.jpg

Potential Battlefield with Scenario D on Golem's turn

Once again, the Archer will move first to take care of the enemy mage, but now instead of all the Hellhounds going next, it's going to be the Golem that acts first because he is in the highest Position (5). Unfortunately, he now spends his turn walking as he cannot reach enemies still in their starting positions! That Archer is still going to die and the Golem will probably still be bitten before the round is over. Since the Treants only have a movement of 2, they are unlikely to reach any Hellhounds to retaliate so they'll spend their first turn walking too. That means the Archer did his job and died for it (he's in every enemy's attack range), but his teammates all just took leisurely strolls and spectated while all the Hellhounds finish Round 1 taking no damage at all and will enter Round 2 with full strength.

On paper, the Combat Pentagon shows the Golem is very strong against Light Melee (Hellhound), but in certain setups, his effectiveness doesn't kick in until Round #2. If you are in the upper tourney provinces where the enemies grossly outnumber you, then you cannot afford to give your enemies free passes each round, which allows them to carry their numbers advantage into the next round unscathed! Sometimes moving first is a huge advantage, like in cases of the Light Range with their high movement and range numbers. Other times, moving first gets you nowhere if you have short movement or limited attack range. We used the same combination of troops in both Scenario C & D, but changed the order of the troops slightly, and thereby their starting placement, which altered how the fight would play out.

Moral of the story: As most battles probably only take 3-5 Rounds to conclude, how you use Round 1 is very important. Try not to waste it walking around!

 
Last edited:

crackie

Chef, Scroll-Keeper, Buddy's #1 Fan
Mastering the Magic Academy
Related Links: Magic Academy Wiki, Expiring Buildings Wiki, Building Sets Wiki

Maxing out your Magic Academy to Level 5 is one of the best investments of :diamond: diamonds :diamond: you can make for your city. A Level 1 Magic Academy takes 8hrs/Relic, but a Level 5 Magic Academy brings that down to just 2hrs/Relic. The disenchantment bonus for spell fragments also increase from 0% to 100%. You will need a lot of Combining Catalysts to get any crafting done, and a max Magic Academy will let you craft 4 in a 24 hour period. For fighting purposes though, we're going to focus on Pet Food, Military Expiring Buildings, and Vitality Surges.

The Fire Phoenix, Brown Bear, Polar Bear, and Twilight Phoenix are a fighter's favorite companions. However to make the most of their benefits, they need to be fed, which makes the juggling of Pet Food an important part of resource management. Pet Food can be won as prizes in events and gained from certain event buildings (Savory Bites), but the most consistent source of Pet Food will be from the Magic Academy.

There are also currently 6 Military Expiring Buildings that can be crafted from the Magic Academy. They are the Unleashed Unit Upgrade (UUU), Magnificent Mage Multiplier (MMM), Enlightened Light Range (ELR), Heavy Melee Shrine (HMS), Heavy Ranged Powerup (HRP), and Light Melee Monuement (LMM). These buildings all expire after 5 days after placing them in the city, and if you place more than one of each instance, their bonuses will stack.

Vitality Surges are Instants that allows you to recover a certain percentage of a Unit Squad fallen in battle. They come in differing levels of recovery and may be used after a battle to revive fallen troops. They can also be won in events, but like Pet Food, the most consistent source to obtain Vitality Surge will still be the Magic Academy.

There are several ways to improve your crafting in the Magic Academy without needing to enroll on Campus in the Sorcerers & Dragon's chapter. At any given time, the Magic Academy offers 5 slots with different recipes. The key is understanding that each slot in the Magic Academy is a container for designated crafting recipes.

Magic Academy.jpg

Magic Academy Categories

Military Expiring Buildings will always appear in the slot designated for Buildings, Pet Food will appear in the slot for Relics/Pet Food/Artifacts, and Vitality Surges will appear in the slot for Portal Profits/Coin Rain/Supply Windfalls/Vitality Surges. Knowing this will help players players increase their chances at obtaining more Pet Food or Military Expiring Buildings.

Collect your crafted items before Magic Academy cycles!
The recipes cycle in 6hr intervals. However, each slot will only refresh with a new recipe if it is not in use. If an item is still in the process of being crafted, that slot will not receive a new recipe when the Magic Academy cycles. If the crafting is complete, but sits idle waiting to be collected, then it will also count as a busy slot and will not refresh with the new cycle. Therefore, always make sure both the Building and Relic slots are available for new recipes when the Magic Academy cycles! The surest way to ensure the recipes refreshes during a Magic Academy cycle is to probably spend Time Instants and zip through the crafting and collect the item right away when you see them.

Craft all the unwanted junk buildings to remove them!
The game only allows you one instance of certain buildings and will not offer you the opportunity to craft them if you already have one out in your city or if a copy already sits in your inventory. These unique sets and buildings includes the Magical Chess Set and the Moonstone Library Set, as well as the bases for all evolve buildings. Therefore, even if you have no interest in the Magical Chess Set, craft them all and let them collect cobwebs in your inventory. That way, the Magic Academy will never offer its pieces in the Building slot ever again! You can do the same with the bases for the various evolve buildings. This strategy does not work for other buildings in the Magic Academy where you are allowed multiple instances, such as Winter Shrines or various unicorns, color flames, codices, etc. A good time to sweep all the unwanted junk buildings out of the Magic Academy is probably during a Fellowship Adventure when you need to make Arcane Residue badges. Might as well make those high vision vapors count!

 
Last edited:

crackie

Chef, Scroll-Keeper, Buddy's #1 Fan
Tools of the Trade - Strengthening Troops
Related Links:
Ancient Wonders Wiki, Expiring Buildings Wiki

Fighting becomes easier when you are able to fight with stronger troops. These are generally done with Ancient Wonders and Military Expiring Buildings, but there is a small scattering of event buildings that will also help.

STRENGTHENING YOUR TROOPS
BuildingObtainedBenefitPet FoodExpire
Fire PhoenixMagic AcademyIncreases the strength of all Units.
Yes​
No​
Needles of the TempestUnlocked in Chapter 3 tech treeIncreases the strength of Light Ranged Units.
No​
No​
Martial Monastery/SanctuaryUnlocks at the end of Chapter 4 tech treeIncreases the health of your troops when in battle
No​
No​
Heroes' ForgeUnlock at the end of Chapter 8 (Orcs) tech tree- Breeds a certain number of Orcs every 24 hours. As a percentage of completed Provinces (rounded up)
- Increases the strength of your Heavy Melee Units
No​
No​
Dragon AbbeyUnlocks at the end of Chapter 10 (Sorcerers & Dragons) tech tree- Stronger mage units (including Bud Sorceress!)
No​
No​
Temple of the ToadsUnlocks at the end of Chapter 11 (Halflings) tech tree- Produces your Barracks' Heavy Ranged Units every 3 hours - as a percentage of your current squadsize (rounded up).
- Increases the strength of your Heavy Ranged Units.
No​
No​
Victory SpringsUnlocks at the end of Chapter 12 (Elementals)- Increases your Training Grounds Training Speed
- Gives your Light Melee Units increased damage
No​
No​
Unleashed Unit UpgradeMagic Academy RecipeGrants 25% more Health Point value for all of your Units. Bonus can be stacked.
No​
5 days​
Enlightened Light RangeMagic Academy RecipeGrants 50% more Attack value for all of your Light Ranged Units. Bonus can be stacked.
No​
5 days​
Magnificent Mage MultiplierMagic Academy RecipeGrants 50% more Attack value on all of your Mage Units. Bonus can be stacked.
No​
5 days​
Dwarven ArmorerSpire of EternityGrants 50% more Health Points to all Units
No​
5 days​
Heavy Melee ShrineTome of the Fearless (Event) or Flash SaleEGrants 75% more Attack value for all of your Heavy Melee Units. Bonus can be stacked.
No​
5 days​
Heavy Ranged PowerupTome of the Fearless (Event) or Flash SaleGrants 50% more Attack value for all of your Heavy Ranged Units. Bonus can be stacked.
No​
5 days​
Light Melee MonumentTome of the Fearless (Event) or Flash SaleGrants 75% more Attack value for all of your Light Melee Units. Bonus can be stacked.
No​
5 days​

 
Last edited:

crackie

Chef, Scroll-Keeper, Buddy's #1 Fan
Tools of the Trade - Training Troops
Related Links:
Ancient Wonders Wiki, Expiring Buildings Wiki

Fighting sustainably is an important part of a fighter's toolkit. Armies need to replenish in time to do another week of tournament or Spire. These are generally done with Ancient Wonders and Military Expiring Buildings, but there is a small scattering of event buildings that will also help.

TRAINING YOUR TROOPS
BuildingObtainedBenefitPet FoodExpire
Brown BearMagic AcademyGives additional units every time you collect them from your Barracks, Training Grounds or Mercenary Camp.
Yes​
No​
Needles of the TempestUnlocked in Chapter 3 tech treeIncreases the strength of Light Ranged Units.
No​
No​
Dwarven BulwarkUnlocks at the end of Chapter 6 (Dwarves) tech tree- Produces Barracks' Light Melee Units every 3 hours as a percentage of your current squadsize (rounded up to the next whole number).
- Increases the Barracks' Training Size as a percentage of you current squadsize (rounded up to the next whole number).
No​
No​
Prosperity TowerUnlocks at the end of Chapter 7 (Fairies) tech tree- Increases the duration of your "Power of Provision" Spells.
- Increases the effect of your "Power of Provision" Spells.
- It produces additional supplies for your city every 3 hours as a percentage of your Main Hall's Supply Storage capacity.
No​
No​
Shrine of the Shrewdy ShroomUnlocks at the end of Chapter 8 (Orcs) tech tree- Produces your Barracks' Light Ranged Units every 3 hours - as a percentage of your current squadsize (rounded up).
- Each level of your Armories increases the training size in your Barracks.
No​
No​
Flying AcademyUnlocks at the end of Chapter 9 (Woodelves) tech tree- Produces units of your Barracks Mages every 3 hours (as a percentage of Mage Units per Squad, rounded up). FREE BUD SORCERESS if you're an elf!
- Increases the training speed of your Mercenary Camp (number rounded up).
No​
No​
Victory SpringsUnlocks at the end of Chapter 12 (Elementals)- Increases your Training Grounds Training Speed
- Gives your Light Melee Units increased damage
No​
No​
D222-z "Simia Sapiens"Unlocks at the end of Chapter 14 (Constructs)Gives additional units every time you collect them from your Barracks, Training Grounds or Mercenary Camp.
No​
No​
Ludibria VentisEventGives a percentage of units every time you collect them from your Barracks, Training Grounds or Mercenary Camp. Bonus can be stacked with Simia Sapiens or Brown Bear
No​
10 days​
Garden StonesEventIncrease Training Size for every Armory level in your city.
No​
60 days​


Last edited:

crackie

Chef, Scroll-Keeper, Buddy's #1 Fan
Tools of the Trade - Free Troops
Related Links:
Ancient Wonders Wiki

The amount of units gained from various buildings are nominal, but if you have the available real estate, then come get your free troops! A building's level often determines what type of troops and the quantity it offers, so your mileage may vary.

BUILDINGS THAT GIVE FREE TROOPS
BuildingObtainedBenefit
Dwarven BulwarkUnlocks at the end of Chapter 6 (Dwarves) tech treeBarracks Light Melee
Shrine of the Shrewdy ShroomUnlocks at the end of Chapter 8 (Orcs) tech treeBarracks Light Range
Flying AcademyUnlocks at the end of Chapter 9 (Woodelves) tech treeBarracks Mage
Temple of the ToadsUnlocks at the end of Chapter 11 (Halflings) tech treeBarracks Heavy Range
Pyramid of PurificationsUnlocks at the end of Chapter 13 (Amuni)Barracks Heavy Melee Units
Tournament ArenaUnlocks at the end of Chapter 17 (Embassies)Venom Drone Riders
Shrine of the ChampionsUnlocks at the end of Chapter 18 (Team Spirit)Gruff Orc Warriors
Tree of EnlightenmentUnlocks at the end of Chapter 19 (Revenge of the Exile)Rangers
Ancestral Resting PlaceUnlocks at the end of Chapter 20 (The Power of Music)Ghastly Banshees
Brown BearMagic AcademyFrogs/Toads, Orc Warriors, Orc Strategists
Vallorian ValorMagic AcademyVallorian Guards
Ground of the Orc StrategistsMagic AcademyOrc Strategists
Witch's HutMagic AcademyFrogs/Toads
Witch's Summoning CircleMagic AcademyBanshees
Wise GolemMagic AcademyBarrack Mage
Gift of AshniEventDryad
Witch DoctorEventCerberus
Triumph of TidesEventVallorian Guards
Bumblebee StableEventDrone Riders
Desert WatchtowerEventDrone Riders
Voice of the ProphetEventBarrack Mages
Training DojoEventRangers
Azure StablesEventFrogs/Toads
Solar Training GroundEventOrc Warriors
Forbidden Ruins (Forbidden Ruins Set)EventBlossom Mages
Gates of Dawn (Dwarven Citadel Set)EventBarrack Heavy Melee
Caves of Dusk (Dwarven Citadel Set)EventBarrack Heavy Range
Golden Wish (Dwarven Citadel Set)EventVallorian Guards
Creepy ClinicEventRangers
Juul's Traveling KitchenEventOrc Strategist/Orc Warrior
Blossoming BruteEventOrc Warrior
Fin StopEventDrone Riders
Divine OrreryEventBlossom Mages
Target ShootingEventDryads


Last edited:

crackie

Chef, Scroll-Keeper, Buddy's #1 Fan
The Curse of Mist Walkers
Related Links: Battlefield wiki, Unit Stats Overview

(Review the Battlefield wiki before you begin if you don't already know how Positions on the map are determined relative to the Army Setup window.

Mob_tglr_1_big.png

Today, we will discuss the most dreaded and unique enemy unit, the Mist Walker. She looks like the Dryad's evil step-sister (pure conjecture as I haven't seen the DNA tests), but her identifying color is brown, which is easy to remember as it resembles the poop she spawned out of. It is also important to note that the Dryad is a mercenary unit and therefore, will appear as enemies in certain Map Provinces. Dryads do not show up as enemies in the Spire or Tournament though as that is all Mist Walker's dominion. Dryads also get a wardrobe change with each promotion, but Mist Walkers remain the same drab brown no matter her level of menace.

MIST WALKER IS MEAN
Mist Walker is getting her own spotlight because she has some very unique specs that makes her an outlier:
  • Has highest initiative of all units and always get to act first
  • Has a higher movement of 4 compared to most other Light Range (same as Ranger)
  • Has a Strike Back (same as Ranger)
  • Has very high Hitpoints (health)
  • Has a very high Attack Bonus against Mages
  • Has a -20% debuff Special Ability that lasts for 3 rounds, which is one of the longest
Mist Walker Stats.jpg

MIST WALKER IS NOT YOUR FRIEND
As she has the highest initiative and acts before everyone else, that means your units must play sitting ducks and take a pot shot from her. When you pair her initiative with her high movement and high mage attack bonus, one Mist Walker can easily take out your entire stack of mages before you even get a shot off. Then you will have to fight the rest of the encounter underhanded. A Mist Walker in Position I is capable of reaching all 5 of your units bearing no obstacles because her high movement allows her to stray into 2 adjacent lanes in either direction to reach more targets. If she's a 3* Mist Walker, then whoever she hits will be stunned for 3 rounds. For autofighters, since AI generally targets by initiative order (there are some exceptions) and she goes first, Mist Walkers are also sponges that will absorb a lot of firepower from your units too since her high hitpoints mean she's hard to kill. To make things even more interesting, there's currently a battle bug where Mist Walker is shrugging off her debuffs too early! Are we having fun yet?

Mist Walker Position I.jpg
Mist Walker Position Ib.jpg

THE ANTIDOTE
There is some good news though. Remember Mist Walker's more colorful doppelgänger that was mentioned earlier? Well, Mist Walkers can be baited with Dryads! If you throw a Dryad into your lineup mix, the Mist Walker will chase after her like a cat to catnip. You don't even need to line the Dryad directly across from her in the same position either. Just remember the Dryad still needs to be within reach though. For example, a Mist Walker in Position 5 cannot reach a Dryad in Position 4, and therefore, this is poor use of bait. It's not 100% guarantee, but statistically significant enough to feel very comfortable deploying mages despite Mist Walkers hanging around. If an obstacle prevents the Mist Walker from reaching your Dryad, she might shoot at alternative targets and you might have to say goodbye to your stack of mages with teary eyes. If your Dryad survives Round 1, Mist Walker will generally still keep her target on the Dryad even in subsequent rounds if both were to survive the opening round.

Another important thing to remember about using Dryad as bait is that she goes last out of all Light Range units. That means she is playing sitting duck to not just the Mist Walker, but every type of enemy Light Range unit as well. By the time the Dryad acts, she might be wounded or debuffed (for 3 rounds!) already. Therefore, when picking your troop lineup, the Dryad might need help taking down that Mist Walker depending on the difficulty of the encounter. For example, one Dryad might work fine in Province 3 of the tournament, but you might find yourself in trouble if you only give yourself one Dryad to handle a Mist Walker in Province 20. By then, you're facing 3* Mist Walkers so every round she survives and gets another shot off, it's 3 rounds of debuff on another one of your units! You also have to account for your poor Dryad taking a Strike Back from the Mist Walker if she is the first to attack her that round. Therefore, in the best of scenarios, that Dryad is a heavy underdog when facing the Mist Walker. She won't be able to take her out on her own and will need help. Using Dryads as bait does mean you need to replace a high amount of Dryads so keep cranking them out in your Training Camps! If you don't need to protect your Mages, then you do not need to use Dryads for bait. The best solution to Mist Walkers is probably Orc Strategists.


Last edited:
Top